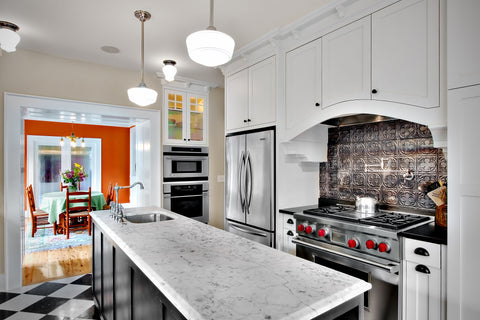
DIY Tin Backsplash Installation

Kitchen backsplashes are pretty much limitless in terms of materials, colors and costs, but only a tin backsplash provides that dazzling wow factor. Unlike tile or stone backsplashes, which are messy and time-consuming, installing a tin backsplash is a breeze. To save you even more time, we've gone through and condensed all our installation videos into five easy steps, making it perfect for a weekend DIY project this spring.
Tin backsplashes are simple to install and can create a warm and inviting kitchen and dining area.

Step 1: Select your pattern and color
Maybe the most obvious step, but the right tin tile pattern can really transform your kitchen. We recommend selecting a 6-inch repeating pattern so it does not overwhelm the small space between your counter tops. Similarly, certain color palates can make your kitchen seem larger. Our design experts are happy to help you find a complementary style that will look great for your unique space.
Step 2: Start measuring
Before installing the tin tiles, be sure you take time to measure the height and width of your area to ensure each panel fits best. Start from the corners of the area and work your way out, marking anywhere with outlets or areas with abnormal shapes where you will need to use tin snips for cutouts.
Step 3: Place the panels
Using LiquidNails, you can start applying the tin panels to the backsplash area. Be sure to apply the glue along the inside perimeter of the nail rail and then push, smooth, and firmly place each tile onto the wall. Be sure the excess adhesive is immediately removed and adjoining the panels along the nail rail. Although you can install this with just an adhesive, if you have the option to use nails it will make your seams a little tighter.
Alternating tin backsplash colors, patterns, and sizes can be a playful addition to your kitchen area as well.
Step 4: Begin trimming

After you have placed all the tin panels onto the wall, trim can finish the look. If you think caulking is necessary, apply it around the edges of the tin panels. While selected touch-up paints can be purchased from American Tin Ceilings, there are larger varieties of color caulk options at stores like Benjamin Moore and Sherwin Williams. American Tin also offers J Channel molding options.
Step 5: Enjoy!
After letting the area dry completely, you are ready to put your appliances back and begin using the area. Easily cleanable with mild soap and water, our tin tiles are rust-resistant and designed for years of use. If you still have questions, be sure to check out our installation videos or give us a call. We'd also love to admire and share your finished project so please send us a photo, too!


